The next time you file a report or give a presentation at work, grab this quick tutorial and create professional and quality screenshots in minutes. No experience required.
Screenshot Editing Tutorial for Photo Editing Beginners
1. Take a screenshot.
Start by taking a picture of your entire screen. For Mac, press Command+Shift+4. For PC, press PtrSc.
2. Open your picture in Gimp.
Download Gimp for free. Open Gimp. Paste your screenshot as a new image.
3. Crop your screenshot.

Click on Rectangle Select Tool in your toolbox. Select the part of the image you’d like to show. Make sure the focus of the image is in the center. Include the same amount of white space on each side for a roomy feel. When done, click Image > Crop to Selection in the drop-down menu.
4. Add a border.
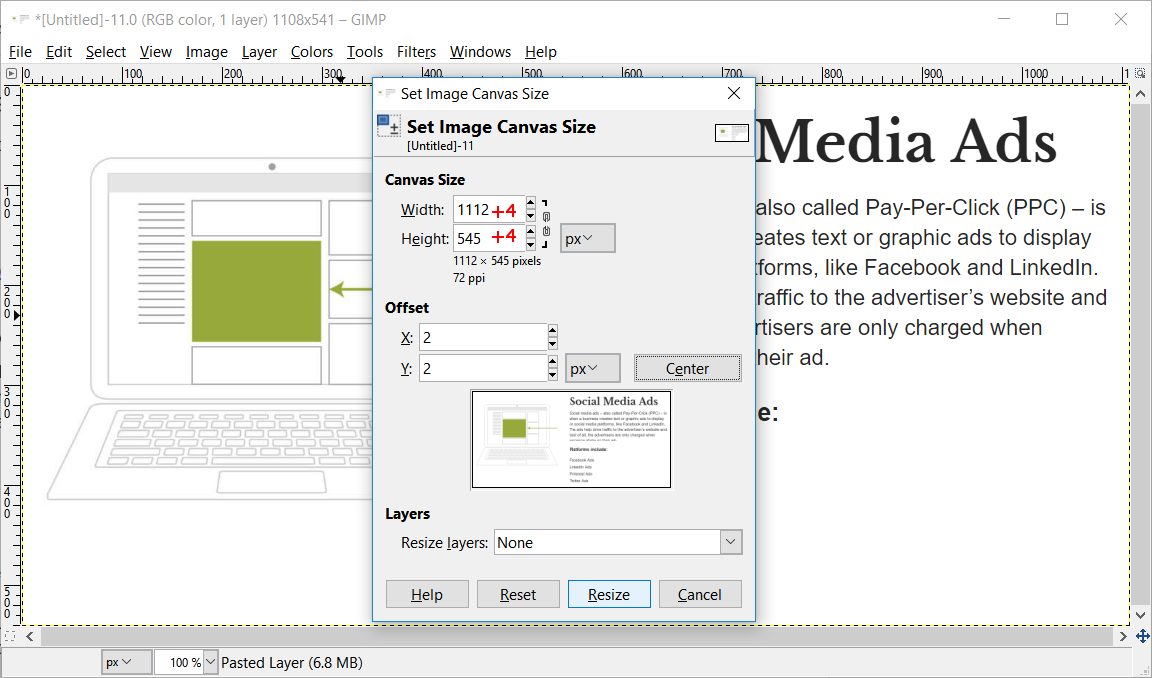
A simple border can add dimension and professionality to a screenshot. Start by increasing your canvas size. In the dropdown menu, do to Image > Canvas Size. Increase the width and height by 4 pixels each. Click Center, then Resize.

Once your image is resized, add a new layer to act as your border. Start by selecting a color for your border. In your toolbox, click Color Picker Tool and select your favorite color out of the image. It can be bold, eye-catching, or subtle.
Once you’ve picked a color, go to Layer > New Layer in the dropdown menu. The layer will default to the canvas size. Make sure Foreground color is selected, then click OK. The new layer will automatically become the top layer. Go to the Layer window, then drag and drop your new layer on the bottom.

5. Save Your Screenshot.
Go to File > Export as to save your screenshot in a readable format. Save your file with .jpg, .png, or your preferred file type (ie socialmediaads.png). Make sure your preferred folder is selected, then hit Export. Another dialogue box will appear. Click Export again.
6. Add Labels
When adding to a screenshot, less is better. You may wish to add emphasis to a specific word or phrase, but don’t go overboard.
For Mac, your screenshot will save directly to your desktop. Double click the photo, and the photo will open in Preview view. You may edit the photo directly in this window. You can add shapes, text, signatures, borders, etc. All functions are accessible on the top ribbon of the window.
For Windows, open your file in Paint. Pick the color for your label. You may use the Color Picker, or select bright red from the colors in the Home menu. Go to the Shapes in the Home menu and select a rectangle, line, or other choice shape. Add your shape to the image.

When done, go to File > Save.
It doesn’t take a master’s degree to make a clear, professional, and useful screenshot. All that’s needed is a basic understanding of what free photo-editing tools have to offer. Over time, you may acquire new skills which will make your screenshots cleaner, catchier, and more innovative.
