WPEngine FTP, Backup, and Migration Step by Step

A step-by step guide for developers on how to migrate a WordPress installation running on WPEngine (NGINX web server) to a fresh WordPress installation on a Windows server running IIS 10.0.

We were recently posed with this scenario and despite some unexpected issues the process took about 2.5 hours including prep work and website testing post-migration. The following instructions are written step-by-step but can also be referred to as a migration checklist.

Migrate WordPress from WPEngine to Windows Server Step by Step

Prep for Migration

  1. Access: Before you start anything, make sure you have working access to FTP or SSH and WordPress as an administrator to both servers.
  2. Backups: Save backups of both of the sites, including WordPress files and database. Having more than one type of backup is always good practice, as it provides options. I’d recommend having tool-based backups (All-in-One, WPEngine) and a manual backup on your local machine via FTP. A manual backup is nice to have for quick access to individual configuration files, while tool-based backups are the quickest and easiest to restore if things really go sideways and you need to restore everything.
  3. Export: We used the All-in-One WP Migration on both servers. On the source server, we created and downloaded an export from the plugin.

importing wordpress site to new server

Migrate Files

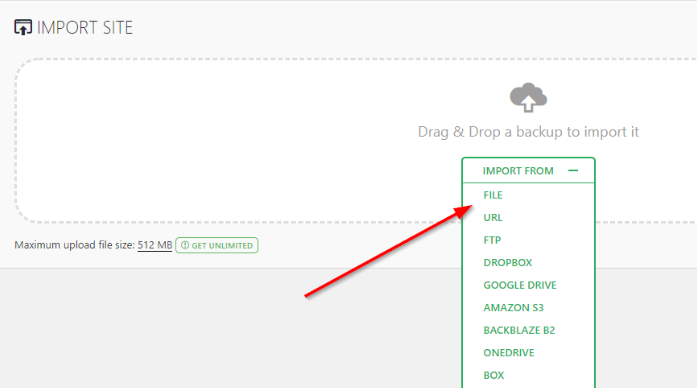
  1. Plugins: On the destination server, you will also need the All-in-One WP Import plugin. This is essentially a helper plugin that will allow processing of large export files. (In our case, the file was around 300MB). Any larger than 512MB and you’ll need to pay for the premium license or evaluate other options. If you want to avoid paying for the license, you may consider manually copying all of the WordPress files via FTP and performing the database migration separately.

all in one wordpress migration extension

  1. Upload size: First, make sure you install the plugin mentioned above, but refer to this article if you need to expand the max file upload size.
  2. Import: Initiate the import and follow the instructions provided by the WP migration plugin. It will prompt you to save permalinks twice. All the data (pages, posts, database content, etc.) will be imported in this step, but there is still testing (and likely some issue resolution) to be done.

import wordpress to windows server screenshot

Test for Errors

  1. Error logs: Turn on the WordPress error logs and monitor them as you go through testing the site. I personally prefer having an error log file and NOT displaying the errors to the page. To do this, add the following to your wp-config.php file:

// Enable WP_DEBUG mode

define( ‘WP_DEBUG’, true );

// Enable Debug logging to the /wp-content/debug.log file

define( ‘WP_DEBUG_LOG’, true );

// Disable display of errors and warnings

define( ‘WP_DEBUG_DISPLAY’, false );

  1. Crawl: Perform an automated crawl of the site to evaluate major issues and find 404s. We use ScreamingFrog’s SEO Spider, which works great (disregarding the frequent updates which must be downloaded and installed manually). 
  2. Browser dev console: This generally means hitting F12 in Chrome and navigating to the console tab. You’ll probably run into some issues with fonts, CORS, issues with the domain change, etc. that need to be resolved.
  3. Visual Inspection: It may seem obvious, but this step is too often overlooked. Browse each page and compare to the source server to ensure there are no visual discrepancies. Pay special attention to layout, fonts, and images.

Fix Issues

  1. .htaccess, nginx.conf vs web.config: Probably THE major difference you’ll notice between hosting WordPress on IIS instead of NGINX or Apache is that IIS uses a web.config file instead of .htaccess or nginx.conf. WordPress also requires specific rewrite rules that you must specify or only the homepage will load, and no sub-pages or subdirectories will load. Here’s an example configuration for your WordPress web.config file. This forces HTTPS and handles the required WordPress rewrite rules:

<?xml version=”1.0″ encoding=”UTF-8″?>

<configuration>

   <system.webServer>

       <rewrite>

           <rules>

               <rule name=”Main Rule” stopProcessing=”true”>

                   <match url=”.*” />

                   <conditions logicalGrouping=”MatchAll”>

                       <add input=”{REQUEST_FILENAME}” matchType=”IsFile” negate=”true” />

                       <add input=”{REQUEST_FILENAME}” matchType=”IsDirectory” negate=”true” />

                   </conditions>

                   <action type=”Rewrite” url=”index.php” />

               </rule>

               <rule name=”http to https” stopProcessing=”true”>

                   <match url=”(.*)” />

                   <conditions>

                       <add input=”{HTTPS}” matchType=”Pattern” pattern=”^OFF$” ignoreCase=”true” negate=”false” />

                   </conditions>

                   <action type=”Redirect” url=”https://{HTTP_HOST}{REQUEST_URI}” />

               </rule>

           </rules>

       </rewrite>

   </system.webServer>

</configuration>

  1. Domain references: The migration plugins do a lot of work but there are always references to the old domain left over in the database after a migration. I’d recommend installing Search and Replace. Create a backup, then use the search and replace function to find all instances of the old domain and replace it with the new domain.
  2. Authentication keys and salts: Check your wp-config.php and look for the section: “Authentication Unique Keys and Salts”. In the code comments of the config file there is a link to generate the new variables and update that section.
  3. Verify plugins: Some licenses may have invalidated in the migration to the new domain. Make sure they’re all valid and working. In our case, our Elementor license invalidated in the move and needed to be updated.
  4. WPEngine: After leaving the WPEngine platform, it’s prudent to remove the WPEngine plugin and associated files.
  5. Robots.txt: On your WordPress dashboard, go to Settings > Reading > Search Engine Visibility, then verify that your robots.txt is not set to disallow all.
  6. Crawl and Inspection: After you’ve completed your work and are getting ready to close out, run one more automated crawl and give the site a thorough manual inspection.

Overall, I was positively surprised by the lack of issues with the migration from NGINX to IIS. Compared to most WordPress migrations, the only major difference came down to using a web.config file rather than nginx.conf or .htaccess. Other than that, the process was fairly typical of any WordPress migration.