
Here’s a quick way to connect your WordPress contact forms to a Google Sheet so you can have an easily accessible storage history of form submissions. Finding a form that works with your site and “does it all” at a reasonable cost limits your choices significantly. This is not a solution for everyone.
In this example, we’ll use Elementor’s built-in form module. The same concept will work with most other form plugins, the only requirement is that they have the capability of sending the form submission to a “webhook”. In this context, the webhook is going to be a URL associated with a Google Sheet that will store a new line on the spreadsheet when your contact form is submitted.
Contact Forms 7, NinjaForms, and GravityForms all support webhooks. If you use a different plugin, you should research whether or not it accepts webhooks on submission.
Getting Started: Create your Spreadsheet
- Create a new Google Sheet
- Click Tools -> Script Editor
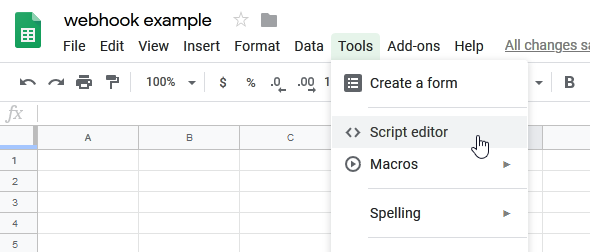
- This should open a file “Code.gs”. We recommend starting with this function:
function doPost(e) {
    var formData = e.parameter;
    SpreadsheetApp.getActiveSheet().appendRow([formData]);
}
This is a fairly simple function that is triggered when the webhook URL is hit and will append the data to a new row in the spreadsheet. Ultimately we’ll be specifying column names that correlate to the form data being submitted – this function will also let us see exactly what those form values are.
- Choose a form that can hit a webhook on submission:
- We use elementor for this example
- Contact Form 7, NinjaForms, Gravity Forms, etc. all have webhook capabilities but you may have to install additional plugins. Try searching for [form plugin name] webook
- Create a google spreadsheet
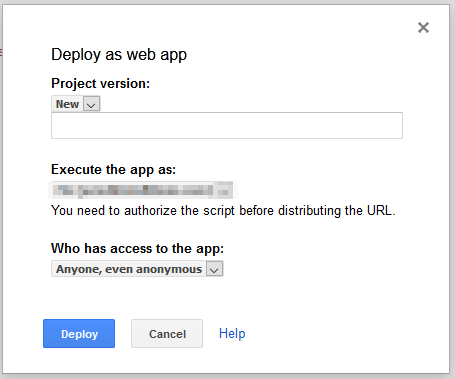
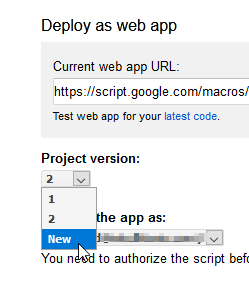
- Publish the app: select “Publish” and follow the prompts.
- Select “anyone, even anonymous” under “Who has access to the app”.
- Note that in our experience you’ll need to select a new project version and re-publish the app each time you want to make changes to the script live.
- After deploying the web app, it may request access that must be approved for the webhook to function properly.
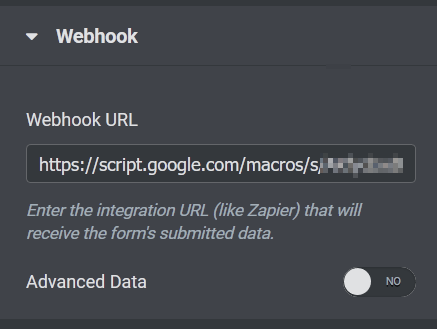
- At the end of the deployment process you should get a long link that begins with “https://script.google.com/macros/…”, copy and paste it in the relevant webhook URL field.
- For the form plugin:
Testing: Submit a Form
- Test by making a form submission
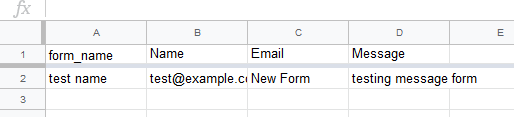
- If you used the testing function, above the form should populate the first empty row with something that looks like this:
{[email protected], Message=test, form_name=New Form, Name=test} Now you can update your spreadsheet based on this information, setting the column names of the form fields. In the above example, the column names for our spreadsheet would be Email, Message, form_name, Name. Copy these exactly, matching case, spaces, underscores, etc.

Update your code to reference the form fields. In this example it would look something like this:
function doPost(e) {
  var o = e.parameter;
  SpreadsheetApp.getActiveSheet().appendRow([
o["Name"],
o["Email"],
o["form_name"],
o["Message"]
  ]);
}
Publish the app. Don’t forget to choose a new project version.
- Submit the form again
- You should have results in the spreadsheet!
Saving form fills in a spreadsheet is a great way to organize multiple pieces of contact information over time. Consider this solution if you’re looking for a way to save data other than in email.